Ever wondered how your favorite idols achieve their iconic makeup looks? Do you think about how you can also look that good daily? The Beauty Team at EnVi has compiled a list of easy tips, tricks, and hacks used by K-pop idols that anyone can use to elevate their style. These techniques can be implemented into your daily routine so you don’t have to worry about spending too much time on your makeup before heading out to work or class!
Makeup Tip: Shadow for liner
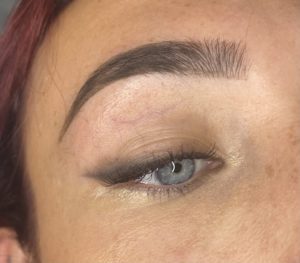
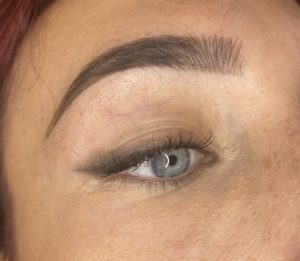
Name: Taylor
Handle: @taylor_louisem
As seen on: Taeyong in SuperM
Why do you love it? Using a shadow, instead of liquid or gel liner, means it’s a lot softer on the face. It’s easier to follow a personal natural eye shape, making it wearable for most people. Likewise, it makes masking mistakes easier, perfect for anyone starting out or those not confident in liner. This method is extremely quick, great for those days where you don’t have a lot of time! Since shadows come in many colors, you have a variety of shades at your disposal and can be as creative as you desire!
How to: To recreate this quick and easy liner, I first dip a thin, flat brush (like this brush from Beauty Bay) into my shadow of choice. Then I swipe along my lash line, flicking it out at the end of my lid to create a tail. For a smokier look, or to cover up any mistakes, I blend out the shadow with a fluffier brush (I recommend this number 08 brush from Docolor). Lastly, finish off with mascara and you’re ready to go!
Products I used:
- Concealer: Revolution Makeup’s Fast Base Stick
- Shadow: Urban decay’s single shadow (BLACKOUT)
- Mascara: Clarins Supra Volume
Makeup Tip: Lipstick for blush
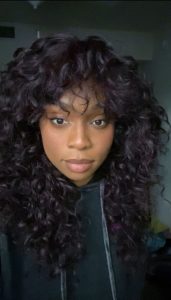

Name: Kryscy
Handle: @enseeteajuan27
As seen on: Seonghwa of ATEEZ
Why do you love it? This makeup trick allows anyone with little to no experience in makeup to add soft and subtle color to their cheeks. By applying with just one’s fingertips, a radiant and warm glow can be achieved. Powdered blushes can sometimes come off intensely on some skin tones, or appear pale and ashy on others. The intensity issue can also be seen when using liquid blush—sometimes the blush gets too colorful, too fast. By using a lipstick color of your choice along with the delicateness of your fingertips, you can easily control how and where you want your blush, whether it be on the apples of your cheeks or the tip of your nose. If you’re looking for a quick and easy way to upgrade your daily makeup look, I highly recommend trying this look out.
How to:
- Start off by choosing a liquid lipstick in a color that you like (I recommend using a soft pink or peachy shade for light skin tones, a mauve or deep peach shade for medium skin tones, a tangerine or berry shade for dark skin tones. However, the possibilities are endless and you can always experiment to see which one you like the most for your specific skin tone).
- Take the lipstick wand out and use a small brush or q-tip to collect a small amount of product.
- Place the product on the back of your hand and with a clean middle finger, dab into the product a few times. Be sure to disperse the color over your hand so that it isn’t too pigmented.
- Use your middle finger and dab the color onto your cheeks, starting off where you’d like the color to be most prevalent and diffusing around it.
- Repeat these steps if you’d like more color, it all depends on how natural you’d like your blush to look.
Products I used: Anastasia Beverly Hills Liquid Lipstick in the shade “Dazed.”
Makeup Tip: Lining lips with liner before applying lip gloss
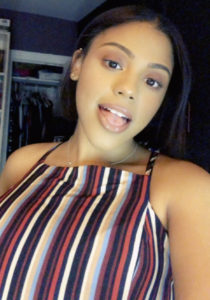
Name: Vanessa
Handle: @yunospeach
As seen on: Somin from KARD
Why do you love it? Applying lipgloss is a nice way to make a look much softer if you’re on the go and don’t want to go for an extravagant look by applying lipstick. However, the biggest challenge with lipgloss is that it tends to bleed out of your lip line. I love applying lip liner before lip gloss in order to prevent my lip gloss from bleeding out. Another reason I love doing this is because it adds versatility to your lip gloss. Sometimes buying a bunch of different shades of lip gloss is just not financially feasible. By applying a lip liner—which tends to be on the cheaper side—you can use a clear lip gloss over it to create a lip gloss in whatever shade you want. You can even blend lip liners by applying different combinations of shades on your lips and then blending them together with the gloss.
Finally, my all time favorite reason for this trick is to shape my lips however I want to! Personally, I love overlining my cupid’s bow so that it looks like I don’t have one. With lipstick, this look tends to appear flat and dimensionless. When I line my lips and use gloss on top, my lips look a lot poutier and fuller. This simple but easy trick has so much versatility and can allow for even make-up beginners to take up their look a notch without much effort!
How to: To recreate the shape of this lip, most of it depends on taking a lip liner and lining over your cupid’s bow. The easiest way to achieve this is to follow the natural curvature of your lips. I began by lining from the outer corner of my upper lip and followed my cupid’s bow, but instead of tracing it exactly, at the highest point I built a bridge between the two peaks and followed the rest of my lip to the other edge. The hardest part is done! Then, I just traced my bottom lip. You can overline slightly outside (which I usually do) of the natural line of your lip if you want to achieve a bigger pout than what you naturally have. Once I have lined my lips, I colored in a little bit below the lines I just drew to fill in more of my lips. This part is crucial! Doing this will ensure that the lip gloss stays in. If you used a darker lip liner – like I did – leaving the center of your lips uncolored will provide a nice gradient. If you want to opt for a more natural look, then use a lip liner that is slightly darker than the tone of your lips for the center, and fill in the outside with a color much more similar to the actual color of your lips. Then finally, I filled in my lips with lip gloss!
Products I used:
- Gloss: Maybelline Vivid Hot Lacquer Lip Gloss in the shade Unreal
- Lip Liner: Colourpop BFF 3 Lip Liner
Makeup Tip: Straight eyebrows with eyeliner

Name: Ellie
Handle: @filthydinosaurs
As Seen On: Irene of Red Velvet
Why do you love it: My natural eyebrows actually grow straight. Because of cosplay, I choose to sparse my brows. The straight brow allows me to follow the shape of my brow hairs while also appearing more youthful. Not only do I follow my natural brow shape, but accentuate my almond shaped eyes. Aside from being a good fit for my face, it is easily achievable with eyeliner. Eyeliner is a product that is a staple in most makeup collections and is easily accessible. For the days where I have to run out the door, using eyeliner is the easiest and fastest method.
How to: To create the straight brow look, take the preferred eyeliner and lightly trace a brow shape. Depending on whether the desired brow shape is more natural or glam, it is easy to adjust the intensity of eyeliner strokes. Usually, I use an eyeliner pen and trace individual hairs. Instead of creating an arch, the shape of the brow should be more of a straight line or close to a straight line. To eliminate any harsh lines I lightly blend the lines with my fingers.
Products I used: Heroine Make Smooth Liquid Eyeliner Super Keep
Makeup Tip: Highlighter as eyeshadow
Name: Annie
Handle: @_whoisannie
As seen on: Hanse from Victon
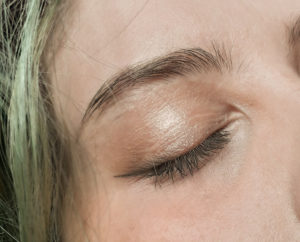
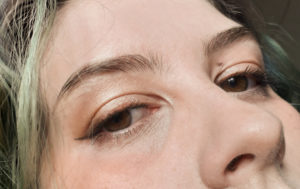
Why do you love it: A trick common in makeup in general, but seen a lot in K-pop, is highlighting the middle and/or the top of your lids with a light shiny color. Of course there are many shimmer eyeshadows exactly for that, but I personally like to use highlighter, especially if it’s one that is reflective but doesn’t have many shimmer particles. That leaves a metallic, almost glossy finish that can elevate any look, from casual to photoshoot worthy. And it works with both powder and cream highlighter!
How to: After you do the rest of your eyeshadow, place a champagne, light gold or rose gold highlighter in the middle of your lid (or inner half corner, or top, depending on your eye shape) with your finger, then tap around for it to blend nicely with the other colors. Or you can use this directly on the lid without any other colors. It works both ways and it will instantly take your eye look to a different level.
An extra tip: if you have very close together eyes like me, add a little bit of highlighter directly to the sides of your nose bridge, just after your inner corner.
Products I used: Light Perfect Glow powder highlighter from Ruby Rose Perfect Me skin palette in Light
Makeup Tip: Highlighter in the inner corner
Name: Chanel
Handle: @aII4yuta
As seen on: Lisa of Blackpink
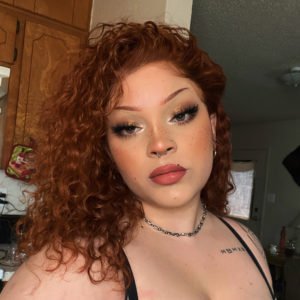
Why do you love it? Highlighting the inner corner is an essential makeup trick for any level makeup artist! This trick makes the eyes more open and bright. Bringing a new kind of life to your eyes. For me personally, it really feels like it seals an entire look together. You can use this trick with a full glam or pair it with some mascara and a clear lip gloss! One of my favorite things to do to switch up the inner corner highlight, is using different colored highlighters. My personal favorites are pinks and lavenders/ I always love to coordinate my inner-corner highlight with my eyeshadow.
How to: To recreate this look, all you need is a highlighter and a small to medium sized brush. (You can also use your fingers, but please remember to wash your hands before going anywhere near your eyes!) Dip into the highlighter of your choice and place the highlighter right at the inner corner of your eye/ You don’t have to limit yourself there. You can also drag the highlight from the inner corner down the first third of the lower lash line! Woo! You’re done! For a brighter pay-off, I recommend spraying your brush with setting spray or water, then dipping into the highlighter.
Products I used: Pat McGrath’s Skin Fetish: Divine Glow Highlighter
Want more beauty? Check out the beauty looks inspired by NCT 127 comebacks here!
Thumbnail by @clau_klau_

